Cool Tools: What I Got for My Birthday…

Dapping

I am incredibly lucky to have an extremely supportive spouse. Perhaps maybe too much so: he loves cool tools as much as I do so he rarely tells me “no” if I want something tool related. Thankfully, I have some restraint…. 🙂

Here are a few items I received for my birthday on April 22 – Earth Day! Forget flowers & chocolate: get me some tools!!! 🙂

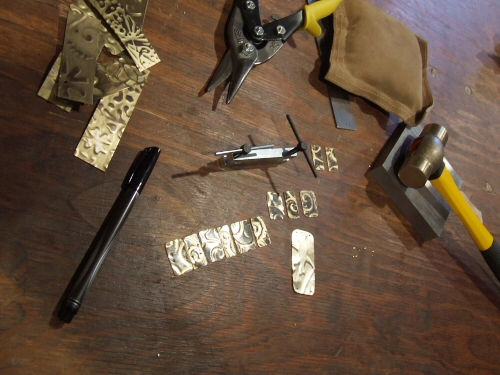
New metal shears! I have a large pair of shears but I wanted a smaller pair. The ones on the right cut on a curve. Neat-o!

Metal hole punches. I have a screw-style metal punch, but I wanted to try this type as well. I will do a comparison review in an upcoming blog post.

This is the item I wanted the most: a dapping block and punch set! I can’t wait to get my hammer on these! 🙂

This is a really neat tool and a total splurge. It’s a necklace mandrel: so you can form a necklace by lightly hammering so that it lays properly across the neck. Very cool…!

This was real nifty as well…what a great way to organize all the little burs and tools. I really like that I can hang my pliers on the back as well. You don’t know how much running around I do for these items! Now, all in one place. Ahhhhh…. 🙂

I also got muslin buffs for my polishing lathe and metal files but that’s BOR-ING compare to these. Now if I can get caught up housework, I can go play. 🙂

Etsy’s Treasury East: New Feature

Treasuryeast

I got a convo from a fellow Etsian that I am featured in her curated Treasury East. This is the first time I have been included in one, therefore my first time to give it a test drive. I’ve not had the time to curate one myself as of yet, unfortunately.

Treasury East has been rather controversial with the Etsy community. With Treasury Main and Treasury West, you would have to wait for the full treasury to “open up” – when the current treasuries expire – and hope to grab one before they fill up. The treasuries fill up in seconds, and if you are the lucky one to grab one and curate, it is a fun and important marketing tool for many Etsy Users.

The difference with Treasury East, is that they never expire, and comments and the number of treasuries curated will be infinite. This left a lot of Etsy users wondering how they will become relevant regarding promotion and marketing: how will potential buyers see the treasuries and wade through the hundreds – if not thousands of treasuries?

Treasury East is still in the testing stage so these questions will hopefully be answered in the coming weeks. I do see some pros to the new format: you don’t have to wait around for one, and the never expiring element means that you can share it on social network or you blog and it will always be visible. The new format is also larger and cleaner looking. “Hotness” is gained not just by clicking and commenting as before, but gained through promoting outside Etsy, using social networking tools such as Twitter and Facebook.

I don’t know when or if I will curate a Treasury East. But I thank you, riorita for including my turquoise chip earrings! 🙂

Creativity Inspired ~ Cool Tool: Microwave Flower Press

Flowerpress

Earlier this year I obtained this neat little contraption called a Microwave Flower Press. They are available at many garden supply stores. I wondered if they really would dry flowers in minutes and still retain the same delicate quality of a flower traditionally pressed in heavy books.

The press is comprised of two terracotta slabs, wool pads and broad cloth. It boasts the ability to dry press flowers in as little as three minutes, and that it will retain the colour of the flower better than the slow-drying method.

After laying the wool pads and cloth onto the terracotta, take the flower(s) you want to dry and arrange them on the broadcloth. It was the middle of winter when I tried this experiment, so I obtained some plants with small flowers from the home improvement store.

After you have the flowers placed as you like, carefully place the other broadcloth, the other wool pad and then the other terracotta slab on top – sandwiching the flowers in between.

Into the microwave we go. It’s recommended that you microwave in 30 second intervals so not to over dry the flowers. Since these were small flowers, I complied with the suggestion. It took about 2 minutes to do most of these little flowers.

I did this experiment twice – and these are the successful flowers. One variety would not dry properly at all – either they were over done & flaky – therefore stuck to the broadcloth, or still retained moisture and stuck to the broadcloth – so just as unusable, either way.

These are the variety of flowers that did not work in the microwave press; I pressed them the traditional way – in heavy books – for 3 weeks. I agree with the claim that the colour is retained in the microwave press. The flowers I traditionally pressed did fade somewhat.

I look forward to trying out larger flowers this summer in the press. I’d also like to incorporate this into jewelry making somehow: maybe set the dried flowers in resin? Oh the ideas… 🙂

Adventures in Brass: Part Two ~ The Initial Project

Brass

My first piece that I made via the brass oxidizing experiment was really, really crude – but it worked up fast. I know my fellow jewelry makers will appreciate the sentiment of just completing a project so that you gain the experience in working with the material – even of the end result is not up to your standards.

The piece turned into two pieces actually – a pair of earrings and a bracelet.

I cut out t he metal using a pair of shears. Then rounded and filed the corners smooth. With a sharpie, I marked where I wanted to punch holes with the screw punch. (You can see another project there on the left working up…for another day. :)). These pictures are straight from the bench, so you see the creative chaos first hand. Sometimes I need to drop what I am doing to develop another idea before I totally forget it. So there are normally many projects on the go at once!

After the holes are punched, I flattened/work hardened the brass using a brass mallet and leather sand bag. Then, the brass pieces were ready for earring assembly…

The completed earrings, with onyx and gold-filled components.

With the rest of the pieces of brass plate, I decided to punch holes – two on each side – and attach together with jump rings.

Sorry terrible pic – but I laid them out staggering the sizes and lightness/darkness from the two brass trophy plates this once was…(and a peek of yet another project in the top right…;)).

Added a magnetic clasp and…there you have it.

These two pieces will be displayed in my workspace as my first ever metal work pieces. I think that it will be neat to see the progression of skill in a few years time. I wish I had of kept the first piece of beaded jewelry I made over eleven years ago! But, I probably sold it! LOL!

Now that I got this get-a-feel-for-techniques project out of the way, my mind is going a mile a minute with ideas. The other projects I am working on involve incorporating the engraver so I am anxious to get them completed and shared. Let’s see how much life gets in the way of play! Stay tuned!

Adventures in Brass: Part One ~ Oxidizing

Brass2

I inherited a lot of trophy brass for my engravers. Besides practicing engraving, I thought I would try my hand at some fun techniques and see what happens. I haven’t had any formal training in metal nor have a worked with it before, other than some crude wire work. I just like to think up an idea and try it out and see what comes of it.

The first thing I did was create patterns on the brass plate using a paper embosser.

Then I needed to rub the surface with a very fine steel wool as trophy plate has a coating to protect it from tarnishing. The steel wool will remove the coating and this is the area that we will oxidize. The effect depends on how much of the coating you remove, but generally, the recessed areas will remain with the coating while the top will not.

The brass oxidizer I have is for the colour black and I got it from an engraving supplier, but is available from many sources including jewelry supply shops. This is an acid so you want to wear gloves and keep out of reach of children.

I used a Q-Tip to apply the solution to my brass plate.

I applied the oxidizer evenly over the surface of the brass plate.

Almost instantly, you will see the brass turn black.

Wipe off the excess…and there you have it. Oxidized, patterned brass. I applied a jewelry wax sealer to the end product.

So what to do with this brass plate? Part two will be the a peek into the projects…

Playing Catch Up…

Babysophie

I am so severely behind with my blog posting. In March, my family & I ended up travelling home to Nova Scotia to attend a funeral. That wiped two weeks out of that month and therefore made me behind on my projects for my “Jewelry Sabbatical“. The 13 hour drive however, gave me a lot of time to think & refocus, and my priorities have shifted a bit. I had a brain wave for the engraving collection, and that is still in conceptual stage while I wait for some logo templates I ordered. I also had a clearer idea about which direction to take the website, so I have been working at updating the look of the site and the overall branding of heavenlyflower.com – all tasks that are severely needed & overdue – I just didn’t expect to be working on that element at all this year! Blame it on retrograde if you must, but these days I just feel motivated to work on getting projects cleaned up, completed and continuing on past goals (like the website). It’s not exactly spending all my live long day at the bench as I had planned, but I am happy with the direction things are headed so I have to go with it. For the first time in 8 years I feel like my goals & dreams are in reach. I tend to go with my gut day to day and this is no exception. Perhaps taking the pressure off this year helped my business goals come in clearer focus. Now to not self-sabotage…a topic I will leave for another post.

I will still be blogging about my new found adventures in creativity as planned however I do have a few topics revolving around the handmade market and business that I will also be writing about as it pertains to what is on my mind these days.

I am also happy to announce that I will be participating in yet another Market Mommy Blog Party next week. Stop by the blog and participate. There will be prizes from fellow mom entrepreneurs as usual. I will be giving away gift certificates! 🙂

Finally: while I was organizing photos I came across this photo of my oldest trying her hand at what mommy does. 🙂 I don’t want them to “hurry up and grow up” but I do welcome the days when I can share my passions with my two girls. This was taken back in October, before my creative space/playroom was finished. She was just newly two years old when this was taken.

The piece I was working on:

The finished project:

More goodies to follow…including my adventures in brass last month!